Manually update Chef 360 Platform in an online environment
You can manually update Chef 360 Platform in the Version history tab of the Admin Console.
Manually update Chef 360 Platform
To manually update Chef 360 Platform in an online environment, follow these steps:
In the Admin Console, select the Version history tab.
Select Check for update to manually check for new versions of Chef 360 Platform.
After the Admin Console downloads an update, a new upstream version displays in the list of available versions.
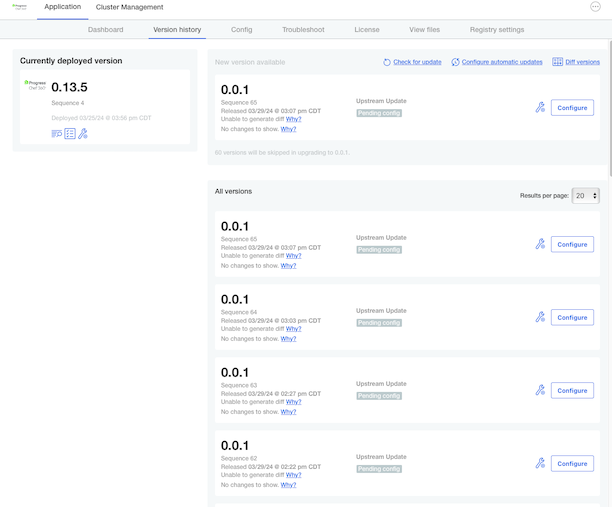
Optional, if there are multiple versions of Chef 360 Platform, you can compare the changes between them by selecting Diff versions in the top-right corner. You can review changes between any two arbitrary releases by selecting the icon in the header of the release column. Select the two versions to compare, and select Diff versions to show the relative changes between the two releases.
Select Deploy next the Chef 360 Platform version you’d like to deploy.
In the Config pane, review and update the Chef 360 Platform settings as needed. After reviewing the configuration, select Next.
In the Preflight pane, review the results of the preflight checks.
If the preflight checks pass, select Next: Confirm and Deploy to proceed.
If the preflight checks fail, choose one of the following options:
Adjust your system settings:
- Select Back: Config.
- Update your configuration by increasing system resources to meet the requirements or by disabling strict mode.
- After updating configuration, select Next to navigate to the Preflight Checks page, then select Rerun to run the preflight checks again.
Cancel the upgrade and restart with new settings:
- Select Cancel to exit the upgrade process.
- Increase system resources or review your strict mode settings.
- Restart the upgrade process when you’re ready.
In the Confirm pane, select Deploy to start the update process.
Update skills
After you update Chef 360 Platform, update your skill assembly so you’re running the latest skills on your nodes. You can update your skills using either the Chef 360 Platform web UI or the node-management-cli tool.
To up a skill assembly, you must use a profile that has the node-manager role.
To update your skill assembly with new skill versions, follow these steps:
Get the latest supported skill versions from the release notes.
Create a JSON file that defines the skills you want to add and remove from your skill assembly. You can define all the skill versions that you want to add and remove from a skill assembly in the same JSON file.
Use the
addandremoveactions to add and remove skills. For example:{ "name": "<SKILL_ASSEMBLY_NAME>", "skills": [ { "action": "add", "skill": { "channel": "stable", "name": "<SKILL_NAME>", "value": ["<ADD_VERSION>"] } }, { "action": "remove", "skill": { "channel": "stable", "name": "<SKILL_NAME>", "value": ["<OPERATOR> <REMOVE_VERSION>"] } } ] }Replace:
<SKILL_ASSEMBLY_NAME>with the skill assembly name<SKILL_NAME>with the name of the skill, for exampleshell-interpreter<ADD_VERSION>with the skill version you want to add<REMOVE_VERSION>with the skill version you want to remove<OPERATOR>with a logical operator, for example<,>, or=
Use the
assembly update-assemblysubcommand to update the skill assembly:chef-node-management-cli management assembly update-assembly \ --skillAssemblyId <SKILL_ASSEMBLY_ID> \ --body-file <PATH_TO_JSON_FILE> \ --profile <NODE_MANAGER_PROFILE_NAME>Replace:
<SKILL_ASSEMBLY_ID>with the skill assembly ID<PATH_TO_JSON_FILE>with the path to skill assembly JSON file<NODE_MANAGER_PROFILE_NAME>with the name of a profile that has the node-manager role
For more information, see the skill assembly documentation.
To update a skill assembly in the Chef 360 Platform web UI, follow these steps:
Get the latest supported skill versions from the release notes.
Navigate to the Skill Assembly page in the Chef 360 Platform UI.
Next to the name of the skill assembly that you want to update, select the assembly’s submenu and then Update.
In the Create Skill Assembly page, enter the skills and skill versions that you want to add or remove from the skill assembly.
Select Update to save your changes to the skill assembly.
Chef 360 Platform will add and remove skills that are assigned that skill assembly.
Update Chef Habitat
To update Chef Habitat, follow these steps:
Select Chef Courier in Chef 360 Platform.
Select Create Courier Job > Create From Template.
Select the appropriate template based on your Habitat Builder setup:
- For Chef Habitat SaaS Builder, select Public Builder - Upgrade Habitat CLI and Habitat Supervisor.
- For Chef Habitat On-Prem Builder, select On-prem Builder - Upgrade Habitat CLI and Habitat Supervisor.
Select Next.
Enter a Job Name.
Select Add Nodes, add the nodes by providing the node ID or node collection, then select Add To Job.
Enter the batch size and batch type, then select Next.
If you selected the On-Prem Builder template, update the
BUILDER_URLvariable in the Command box:For Linux, replace
export BUILDER_URL=''with:export BUILDER_URL='<TENANT_FQDN>/hab/builder/v1'For Windows, replace
$BUILDER_URL=''with:$BUILDER_URL='<TENANT_FQDN>/hab/builder/v1'
Replace
<TENANT_FQDN>with your Chef 360 Platform tenant FQDN, for example:http://chef360.example.com:31000.Select Next, update any other settings as needed, then select Save Job to create and run the job.
Uninstall old Chef Habitat Supervisor and Windows Service packages
After you update Chef Habitat, you can uninstall older Habitat Supervisor and Windows Service packages to free up disk space:
In the Chef 360 Platform web UI, select the Chef Courier tab.
Select Create Courier Job > Create From Template.
Select Cleanup Habitat Packages, then select Next.
Select Add Nodes, add the nodes by providing the node ID or node collection, then select Add to Job.
Enter the batch size and batch type, then select Next.
Select Next, update any other settings as needed, then select Save Job to create and run the job.